
Automate your household appliances with this simple door sensor tutorial. With open source software and components available in plenty, create your own creative DIY‘s.

With an Interesting line up of DIY’s Satya likes to build projects, experiments, robots, and design products of his own in electronics. Working as an embedded software developer for a firm, he contributes his time to document and blog his ideas, projects and experiments so the IoT and electronic community gets benefited
Door Sensor:
Sensors with Push notification is always fun. In this article, we will Connect a door sensor to wifi using ESP8266. Then we will be sending a push notification to our smartphone when somebody opens or closes the door.
The main component of a Door sensor is a reed switch, which makes a close connection when somebody places a magnet near to it.
The reed switch is an electrical switch operated by an applied magnetic field. It consists of a pair of contacts on ferrous metal reeds in a hermetically sealed glass envelope as represented in the image below.
Door sensor can be bought from e-commerce websites under $5.

Node MCU:
NodeMCU is an esp8266 based breakout board, having USB to TTL on board for programming. Below is an of NodeMCU board.

Note: On Board GPIO numbers like D0, D1, D2, etc are just representations and do not appear on the real GPIO in node MCU board.
The GPIO number, given in the above image inside red box, are the real GPIO pins to be used in the Arduino sketch while programming.
Circuit Diagram:
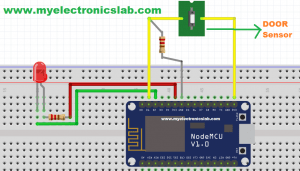
When we look at the schematic, we will see D1 is GPIO5 that is connected to the Door Sensor with a Pull Down Resistor which is connected to D1 to GND. Hence when the magnet part of door sensor comes closer to the reed switch, D1 i.e GPIO5 goes high.
Let’s write Code to detect The door is pressed and send notification to the server:
#include
#include
#include
const char* ssid = “ehlab”;
const char* password = “raniraja1”;
const int DoorGpioPin = 5; // D1 of Node MCU
const int ledGpioPin =4;
int doorState=0;
int ledState=0;
#define closed 0
#define opened 1
const char* host = “myelectronicslab.com”;
void setup() {
Serial.begin(115200);
delay(10);
// prepare GPIO2
pinMode(DoorGpioPin, INPUT);
pinMode(ledGpioPin, OUTPUT);
// Connect to WiFi network
Serial.println();
Serial.println();
Serial.print(“Connecting to “);
Serial.println(ssid);
WiFi.begin(ssid, password);
while (WiFi.status() != WL_CONNECTED) {
delay(500);
Serial.print(“.”);
}
Serial.println(“”);
Serial.println(“WiFi connected”);
// Start the server
Serial.println(“Server started”);
// Print the IP address
Serial.println(WiFi.localIP());
}
void loop() {
// While pin 12 is HIGH (not activated)
// yield(); // Do (almost) nothing — yield to allow ESP8266 background functions
if( digitalRead(DoorGpioPin)==HIGH && doorState==opened){ // Print button pressed message.
SendDoorCloseNotification();
Serial.println(“Close”);
doorState=closed;
ledState=1;//on
digitalWrite(ledGpioPin, ledState);
}
yield();
if( digitalRead(DoorGpioPin)==LOW && doorState==closed){
SendDoorOpenNotification();
Serial.println(“Open”);
doorState=opened;
ledState=0; //off
digitalWrite(ledGpioPin, ledState);
}
yield(); // this is most important part of the code, as it tells the esp8266 keep running background wifi work,
//without this, your code will disconnect from wifi, after long run of code.
}
void SendDoorOpenNotification()
{
WiFiClient client1;
const int httpPort = 80;
if (!client1.connect(host, httpPort)) {
Serial.println(“connection failed”);
return;
}
String url = “/test/”;
url += “SendDoorOpenNotification.php”;
Serial.print(“Requesting URL: “);
Serial.println(url);
client1.print(String(“GET “) + url + ” HTTP/1.1\r\n” +
“Host: ” + host + “\r\n” +
“Connection: close\r\n\r\n”);
delay(10);
while(client1.available()){
String line = client1.readStringUntil(‘\r’);
Serial.print(line);
}}
/*
Note: This is not the right way, I expect you to pass open/close as parameter to a single function to save
programme memory
*/
void SendDoorCloseNotification()
{
WiFiClient client1;
const int httpPort = 80;
if (!client1.connect(host, httpPort)) {
Serial.println(“connection failed”);
return;
}
String url = “/test/”;
url += “SendDoorCloseNotification.php”;
Serial.print(“Requesting URL: “);
Serial.println(url);
client1.print(String(“GET “) + url + ” HTTP/1.1\r\n” +
“Host: ” + host + “\r\n” +
“Connection: close\r\n\r\n”);
delay(10);
while(client1.available()){
String line = client1.readStringUntil(‘\r’);
Serial.print(line);
}}
If you see the above code, we are calling two php file : sendDoorCloseNotification.php and SendDoorOpenNotification.php, which are hosted on mentioned server (const char* host = “myelectronicslab.com”;)
In this project, we are using instapush to send notification to mobile phone (Andriod Smartphone). These two files request to the instapush server. As a beginner, it would be better to use Instapush if you have no idea about android programming or GCM. This would be your best free application to test push notification. You can download the both Php file and the library for Instapush.
Link to Satya’s Blog: click here


Node MCU works on 2ghz, so this may not work with the internet 4&5 ghz.
This works well with hotspot of the mobile, because of ths reason distance coverage is limited.